- Home
- Energy Retrofits
- Projects
- Finance
- Financial workshops
- 1st Financial workshop - London, UK
- 2nd Financial workshop - Bratislava, SK
- 3rd Financial workshop - Copenhagen, DK
- 4th Financial workshop - Dublin, IE
- 5th Financial Workshop - Milan, IT
- 6th Financial Workshop - Leipzig, DE
- 7th Financial Workshop - Sofia, BG
- 8th Financial Workshp - Sophia, BG
- 9th Financial Workshop - Växjö, SE
- 10th Financial Workshop - Barcelona, ES
- 11th Financial Workshop - Barcelona, ES
- 12th Financial Workshop in Paris, France
- Final Financial Workshop
- Questionnaires
- Financial workshops
- Products
- Events/Awards
- Downloads
Products to Focus
The problem:
There is a need for products and components that respond to the specific needs of step-by-step retrofit in order to achieve energy efficiency in a cost-effective way.


The solutions
The following design briefs contain the concepts and criteria for different solutions that tackle some of the main problems encountered in step-by-step retrofits.
You can find a summary of all the product demands here.
Window Connections
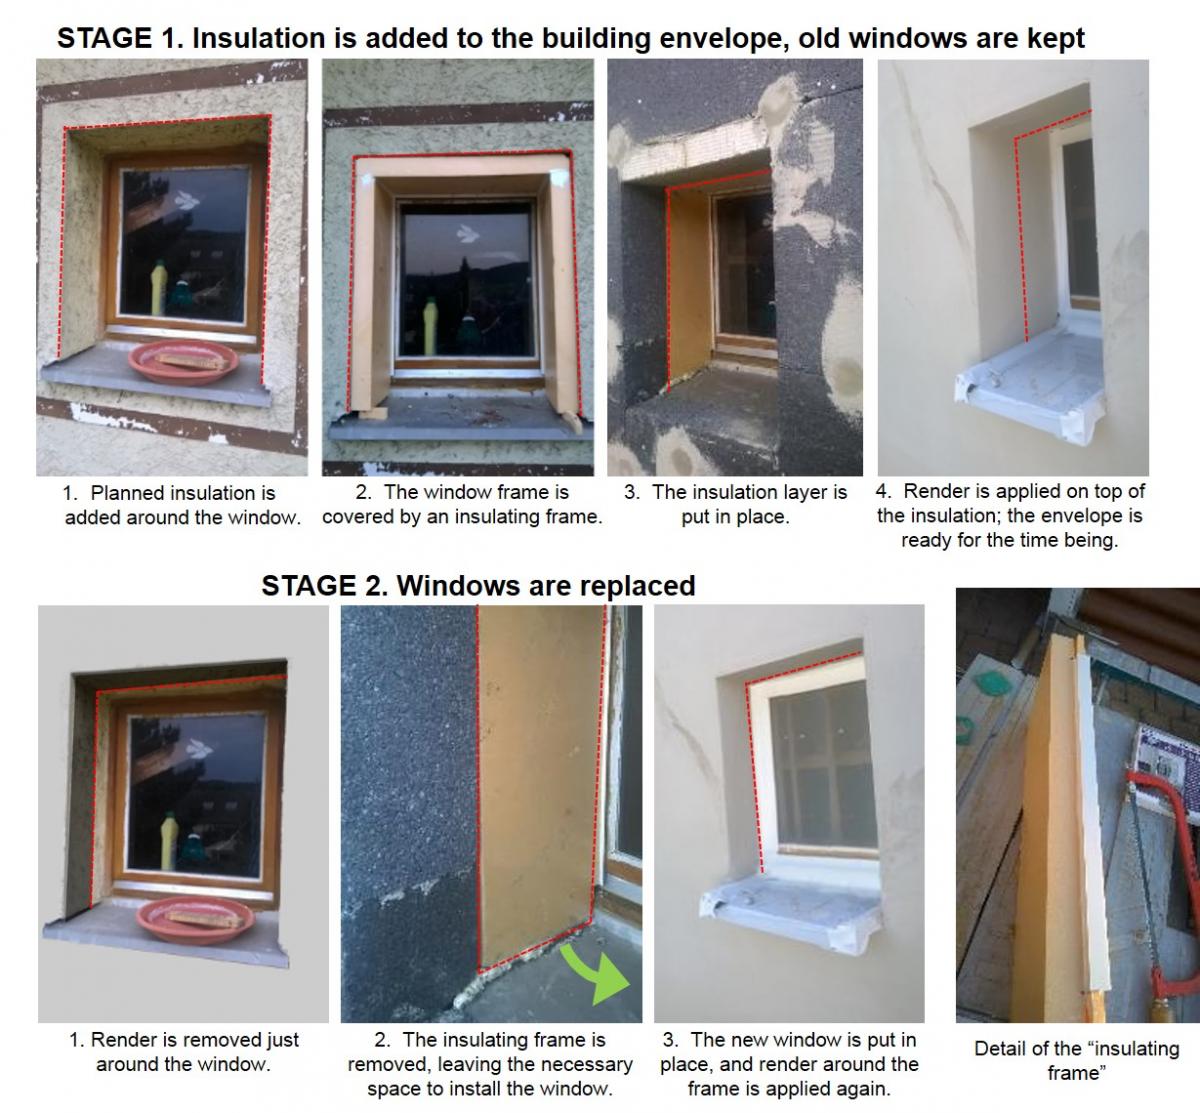
a. Windows first / insulation later
Two main problems should be considered when installing new windows in an existing wall. First, the improved airtightness performance of the new window may lead to the formation of mold in the old wall if additional ventilation is not considered. This need for additional ventilation should be highlighted with the end-user in order to prevent mold. Second, the best installation situation for the window is when it is aligned to the insulation layer, which, in this case, would be added on a later stage. Ideally, the installation of the window should be planned in such a way that, when the insulation layer is added, the window ends up in the best installation position. Several solutions are suggested for this case, for example:

Find out more about window installation connections, window first:
- Download the Design Brief.
- Examples: These and other solutions were explored for the Passive House Component Award in 2015. The award winners and the competition can be found here.
- Read the Passive House criteria for this component.
- Take a look at the certified Passive House components in the database.
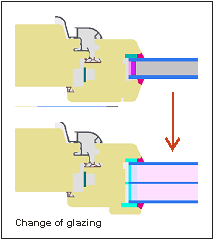
b. Insulation first/ windows later
The need to renew external render in old buildings is a great opportunity to improve the thermal envelope, since exterior insulation can be added at the same time. Ideally, old windows could also be changed for ones with better thermal properties. But in many cases, existing windows are not yet at the end of their lifecycle, so there is no point in replacing them. Two things have to be considered for the connection of the existing windows:
- The position of the window will create a thermal bridge that will affect the energy performance of the building, despite the newly added insulation layer. Can this situation be improved temporarily by over-insulating the old frames?
- The windows will be changed later on, giving the opportunity to put them in the right position in the envelope.
Find out more about window installation connections, insulation first:
- Download the Design Brief.
- Read the Passive House criteria for transparent components.
- Take a look at the certified Passive House components in the database.
Attic Floor Insulation
Trap doors / attic stairs
When the ceiling between the attic and the living areas is part of the thermal envelope, the characteristics of the attic stairs/door must also be considered, including: thermal transmission and resulting surface temperatures, airtightness, mounting system and related thermal bridges. For retrofits, three different options are suggested for this situation: use an insulated and airtight hatch on top of the existing attic stairs, add a fully insulated and airtight, new trap door, or a combination of the two.

Find out more about trap doors / attic stairs:
- Download the Design Brief.
- Read the Passive House criteria for this component.
- Take a look at the certified Passive House components in the database.
Windows with integrated shading
Existing shading solutions for windows have several disadvantages. Shading devices installed inside the buildings provide good control of light, but allow the heat to get to the interior. Exterior shading is the most effective, but not cost-effective, especially considering decay due to exposure to weather conditions and maintenance requirements. Integrated shading is an option, but current options in the market do not allow for the replacement of the shading device alone. When it breaks down, the whole window system should be replaced. The solution here is that one of the glazing layers (the one on the outside), should be operable, allowing for replacement and maintenance of the shading device.
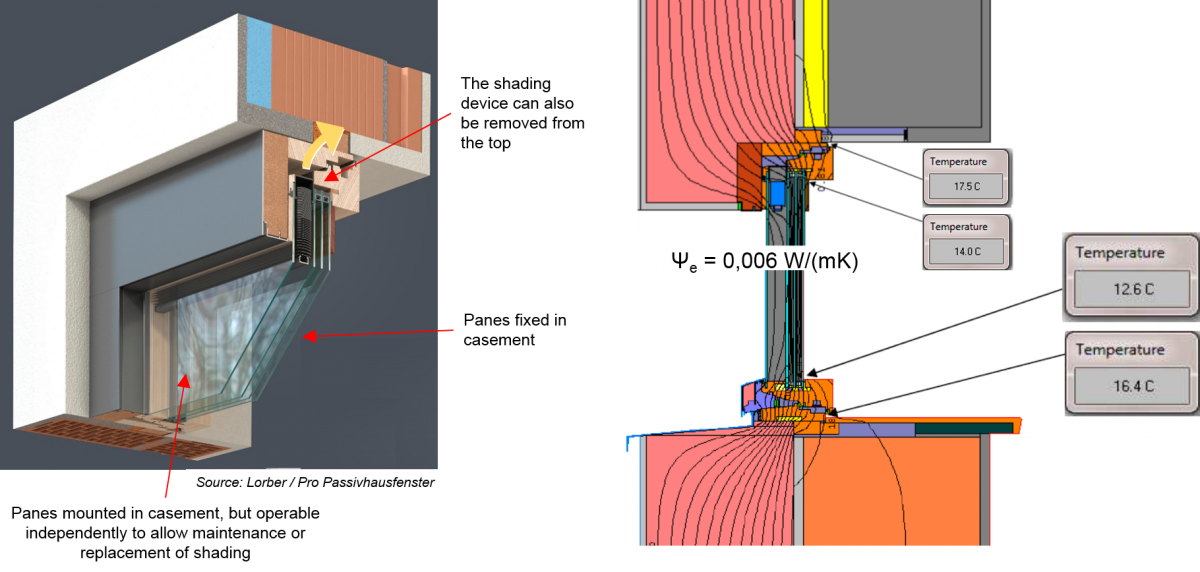
Special considerations are: possible condensation on the exterior glazing, and solutions considering fixed windows and also different types of operable windows (slider, tilt, etc.).
Find out more about integrated shading in windows:
- Download the Design Brief.
- Examples: These and other solutions were explored for the Passive House Component Award in 2015. The award winners and the competition can be found here.
- Read the Passive House criteria for this component.
- Take a look at the certified Passive House components in the database.
Improving existing windows
Often, windows have a much longer service life than predicted, specially wooden windows. If a window is in a good condition, its thermal properties might be improved by replacing the glazing and by covering the frame and the sash with insulation. The latter one could best be done in one step together with wall insulation. By doing so, Passive House quality can be achieved even with old window frames.
Find out more about improving existing windows:
- Download the Design Brief.
- Read the Passive House criteria for windows.
- Take a look at the certified Passive House windows in the database.
Roof to wall connections
Special attention has to be put in roof to wall connections in order to guarantee the properties of the thermal envelope (no thermal bridges, airtightness, no water infiltrations or risks of condensation, etc.). The proposal for a step-by-step retrofit is a set of kits designed for common roof typologies and wall insulation measures. The design brief elaborates on three examples:
- Eave connection to sarking pitched roof
- Eave connection to ceiling insulation
- Parapet connection
The example below shows the eave retrofit kit for exterior insulation.

Find out more about roof to wall connections in retrofits:
- Download the Design Brief.
- Read the Passive House criteria for this component.
- Check the Passive House certified opaque components.
Window / Façade integrated PV
a. Insulation implementation concepts
In retrofits, 2 situations could be found:
1. PV panels installed with the insulation.
PV panels are installed at the same time as the insulation of the walls. It must be ensured then, that the substructure of the PV panels is mounted with special anchors to avoid high energy transmission losses by aluminum brackets or similar traditional fixings. In this case, several products already exist that tackle this problem.
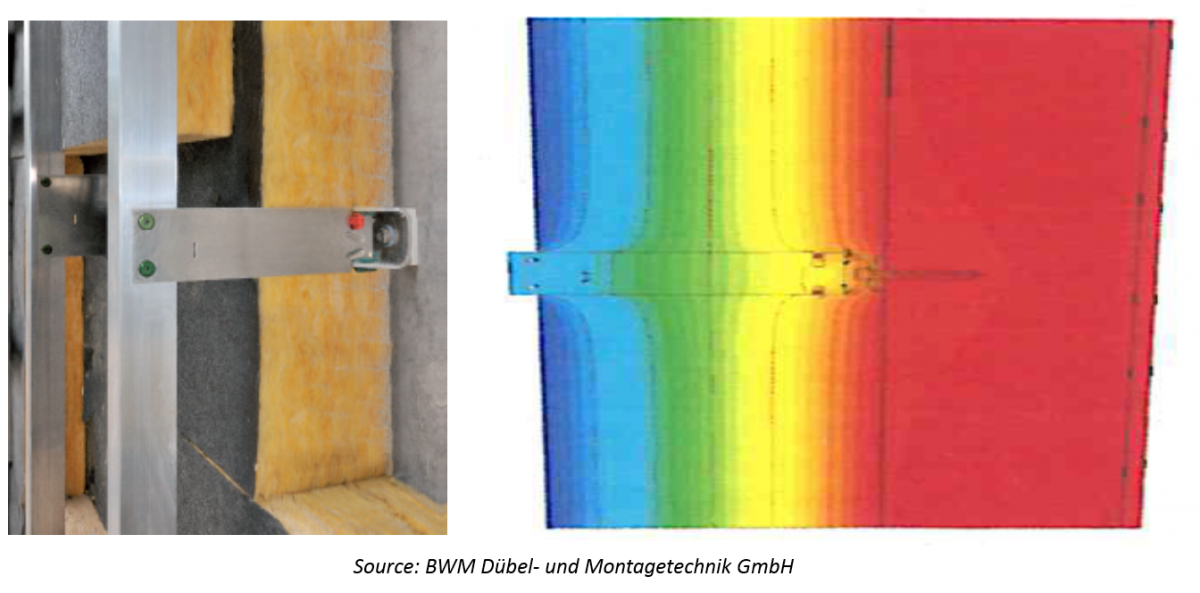
Common PV substructures available on the market could incorporate similar high performance anchors to their system, offering a ready-to-use PV mounting system suitable for deep energy retrofits. You can find the list of Passive House certified façade mounting systems here.
Find out more about PV implementation on insulation systems:
- Download the Design Brief (coming soon).
- Read the Passive House criteria for this component.
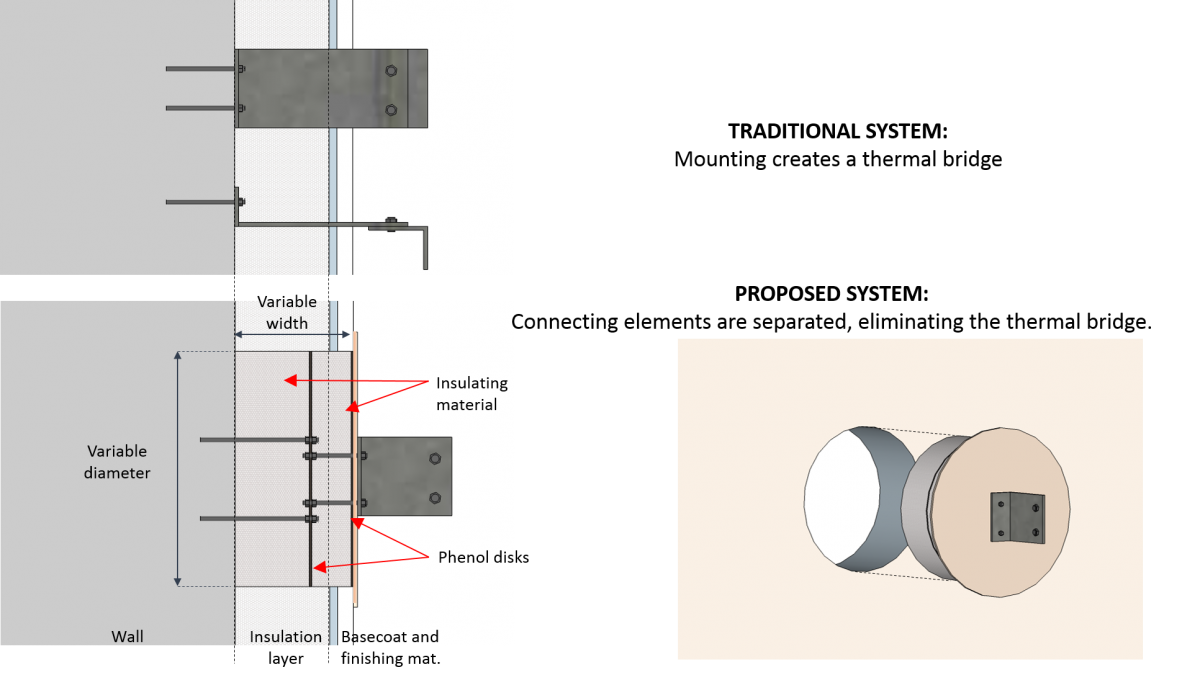
2. PV Panels installed after the insulation layer
PV panels are installed after the insulation. In this case, it must be ensured that the penetration does not affect the thermal performance of the building envelope. A pre-fabricated element that is designed to fit the drilled hole, break the thermal bridge and including insulation, would solve this issue. See figure below.
Find out more about PV implementation on insulation systems:
- Download the Design Brief (coming soon).
- Read the Passive House criteria for this component.
- Check the Passive House certified façade mounting systems here.
b. Glazing implementation concepts
The general concept is to take advantage of existing glazing, for instance, in curtain wall facades, and integrate a PV grid without the need of replacing the windows. For instance, through a film that is installed over the glazing. Special considerations in this case are, how to integrate the necessary wiring without altering the appearance of the façade, and reduced solar heat gains / visibility through the used glazing.

Find out more about PV integration in glazing:
- Download the Design Brief (coming soon).
- Read the Passive House criteria for transparent components.
c. Roof / wall cladding replacement concepts
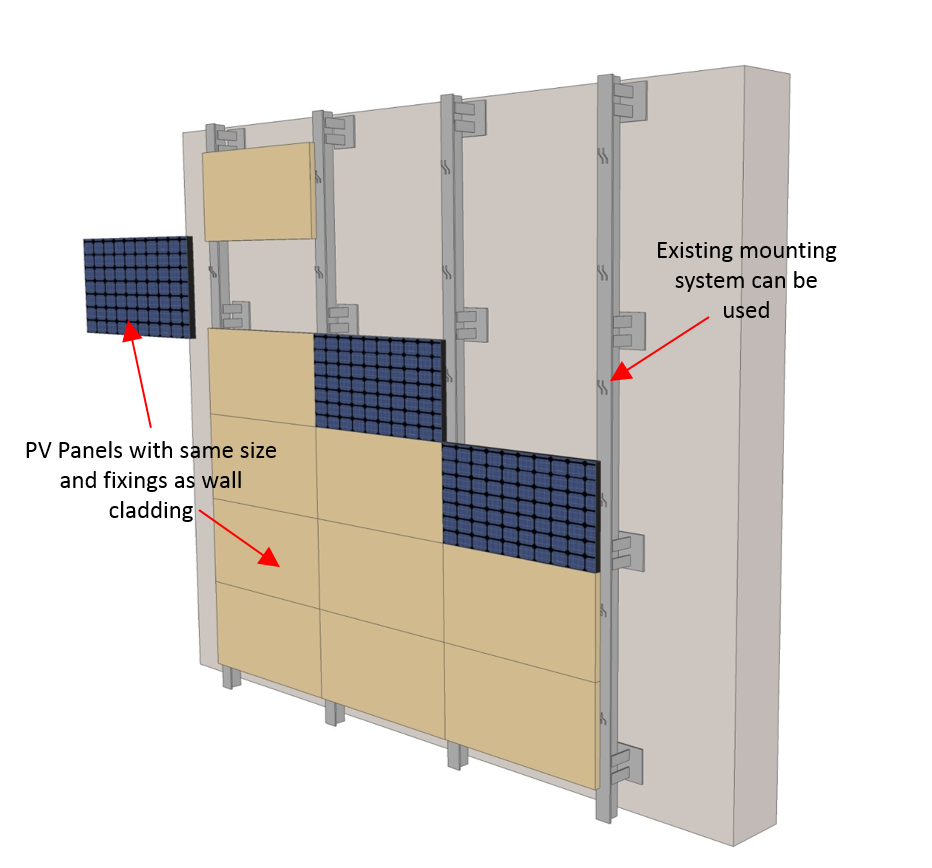 The idea is that, whenever cladding has to be replaced, it would be possible to add a PV installation in the façade, simply by replacing the cladding with PV panels. This would require, for example, that the modulation and fixing system of the panels are similar to those of the existing cladding.
Find out more about PV replacement in roof/wall cladding:
- Download the Design Brief (coming soon).
- Read the Passive House criteria for this component.
- Check the Passive House certified façade mounting systems here.
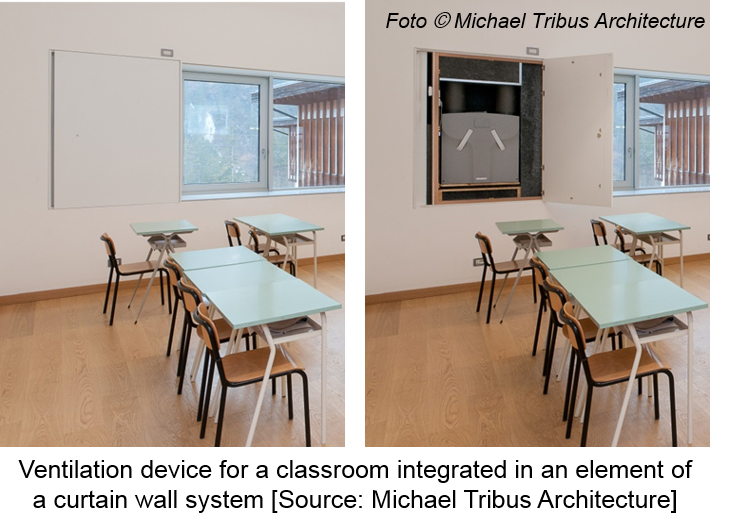
Wall / Façade Integrated Ventilation
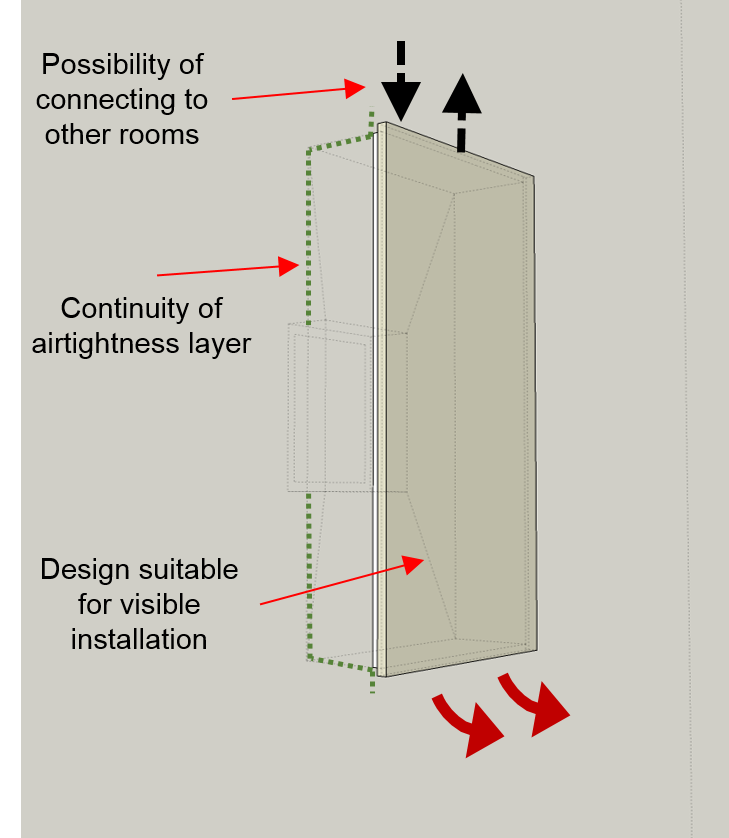 Good products to be used for refurbishments are those with simple on-site installation and that take as little of the living space as possible. Ventilation units that are integrated into the building walls avoid the need of technical rooms. These products are readily available in the market, allowing to supply air to one room or even a small dwelling. The advantage of using the unit for only one room is that there is no need for additional ducts. Special considerations are: design that is suitable for visible installation, airtightness, and noise control. New products are needed since the air-flow rates of available products are too low (up to 50 m³/h) to use the unit as a centralized device, and special solutions for non-residential buildings are needed too.
Find out more about integrated ventilation in walls:
- Download the Design Brief for more information on the requirements as well as examples of developments in this area.
- Read the Passive House criteria: for ventilation systems (general) and for single-room ventilation systems.
- Check the Passive House certified ventilation systems here.
Window Integrated Ventilation
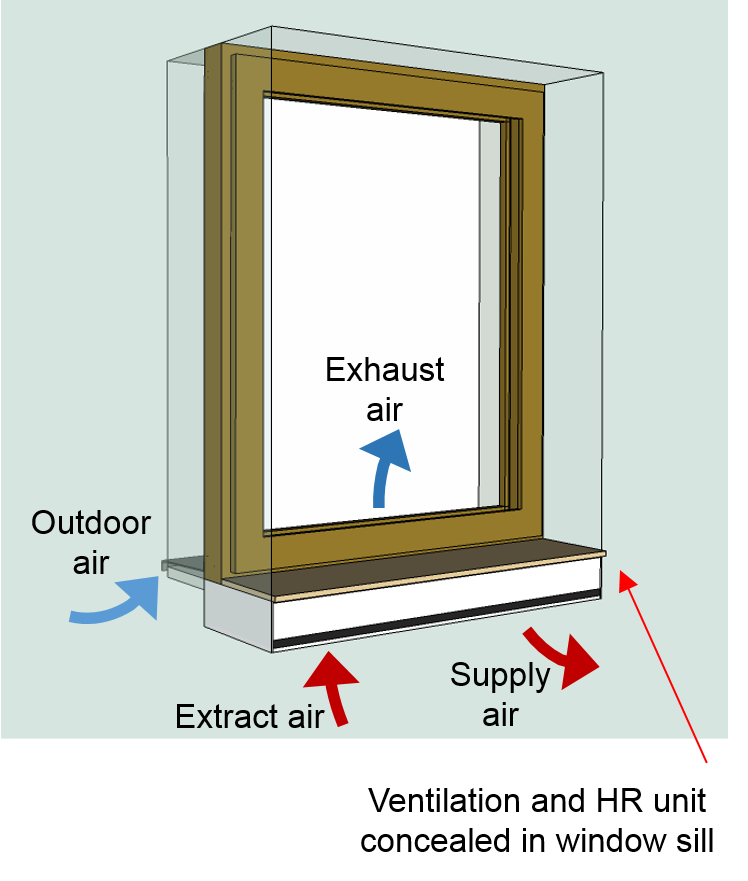 If windows are being replaced in an old building, a ventilation system can also be integrated, for instance, in the window frame itself, on the space used for the old shutter box, in the parapet, or a separate box. Special considerations for this component would be thermal bridges, accessibility for filter exchange, noise control, and also, the traditional overflow concept does not work with this type of ventilation units. However, being a decentralized unit, there is no need for ducts and the structure of the building is not altered. Several products exist in the market, but so far, they do not include a heat recovery system with the efficiency required for the Passive House standard.
Find out more about integrated ventilation in windows:
- Download the Design Brief.
- Read the Passive House criteria: for ventilation systems (general) and for single-room ventilation systems.
- Check the Passive House certified ventilation systems here.
Active Overflow Ventilation System
The idea behind this concept is to ventilate only one central room (hall or living area) with fresh air. Active overflow elements distribute the supply air in neighboring rooms e.g. over the door or through the wall. Passive air transfer elements are sufficient for the backflow to the hall. The only ducts required are the extract air ducts in bath and kitchen transferring the extract air flow back to the ventilation device. Special considerations are the geometry of the building and possible noise transfer.

Find out more about active overflow ventilation systems:
- Download the Design Brief.
- Read the Passive House criteria: for ventilation systems (general) and for single-room ventilation systems.
- Check the Passive House certified ventilation systems here.
Ventilation Duct Systems / Tools
Including a ventilation system in an old building is a challenge, since it requires taking space from the living areas, as well as installing ducts throughout the building. Several options are suggested for product development in this regard:
- Ducting within the thermal envelope – the idea is to include the ducting system in the insulation layer, to reduce ducts inside the dwelling. Flat ducts that can be integrated already exist, but the idea is to have a pre-fabricated façade element combining the duct and the insulation that is easy to install.
- Ducts suitable for visible installation – so that ducts inside the thermal envelope are easy to install and do not need to be covered with plasterboards or other cladding. The appearance of the duct can be designed so that it integrates to the interior design.
- Devices installed on the ceiling, designed to be visible.
- Pre-fabricated components for wall penetrations, to guarantee airtightness and reduce wall penetrations to a minimum (for example, with a duct-in-duct solution that carries both supply and exhaust air).

For these products, special considerations are: thermal-bridge-free design, effects on the thermal performance of the building when ducts are installed within the insulation layer, ease of access to the ducts for maintenance, among others.
Find out more about ventilation duct tools:
- Download the Design Brief.
- Read the Passive House criteria: for ventilation systems (general) and for single-room ventilation systems.
- Check the Passive House certified ventilation systems here.
Drain Water Heat Recovery
Remodeling of bathrooms is a good opportunity to include a heat recovery unit that could help reduce the useful hot water demand. The basic concept is that heat from drain water is transferred back to the flow of fresh water during showers (it only works when the flows occur simultaneously). Special considerations are:
- It needs to be connected to both the hot and cold water, and the sewage.
- Ease of maintenance, or maintenance-free.
- Final height of the shower basin (especially considering requirements for universal design).
The suggested products include:
1. DWHR Pre-fabricated shower basin
This would integrate the DWHR unit and the siphon, to be installed in the place of the old shower drainage.
2. DWHR for barrier-free retrofits
In this case, the pre-fabricated basin would be designed so that the slope and final height of the basin fulfill accessibility requirements.

3. DWHR for bath tubs
The same concept may also be applied when a bath tub is being installed or replaced, taking advantage of the space underneath the tub. This option would work when a shower is also included in the same space, or whenever the user takes a shower in the bath tub.
Find out more about drain water heat recovery:
- Download the Design Brief.
- Read the Passive House criteria.
- You may find the Passive House certified DWHR components here.
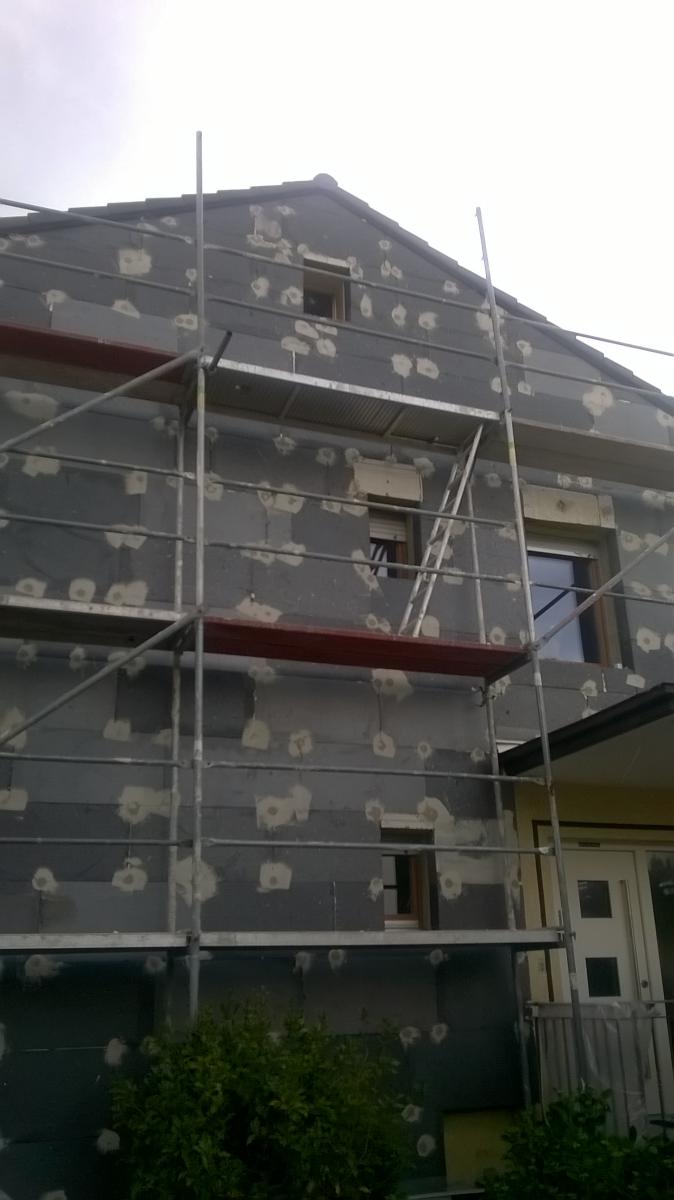
External Air-tightening, Insulation and Finishing System (EAIFS)
Applying the airtightness layer for retrofits often raises the question if this can be done on the internal or external surface of the existing walls. For step-by-step retrofits, when the buildings are still inhabited, it is advisable to realize it on the outside. To avoid additional effort, this product would be an enhancement of the existing External Insulation and Finishing Systems (EIFS) to include the airtightness layer in the system, thus avoiding one extra working cycle. Since the airtightness layer is added on the exterior of the structural wall, the many geometric complications and penetrations on the inside part are avoided. The special considerations for this product are:
- Location of the airtightness layer, according to climatic factors and vapor diffusion properties of the selected material. Depending on the materials used, the airtightness layer can be a coating, a sheeting, or the insulation block itself.
- Joints between the blocks should also be sealed, which requires proper application of the adhesive along the whole perimeter of any block. Then, the properties of the adhesive are very important for the performance of the system.
- Special attention is required in corners, windows and other openings and penetrations, where sealing/reinforcing tapes, or special solutions have to be implemented.
- The use of dowels to fix the insulation layer should be minimized, and special dowels or adhesive should be used to guarantee that the airtight layer is not interrupted.

Also, similar solutions may be useful when the insulation and airtight layer are on the interior, for example, in corners formed by different building components, or when insulating the ceiling of a cellar.
Learn more about EAIFS:
- Download the Design Brief here.
- Read about the Passive House criteria for opaque construction systems.
- Check the certified wall and construction systems in the database.
Regenerative MVHR, Alternating Type
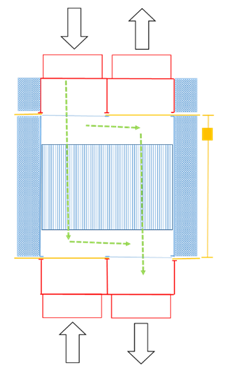 This kind of systems are available in the market, but either they are for large scale projects, or their efficiency does not fulfill the Passive House requirements. Another concern is the price of suitable units; in order to have more cost-effective solutions, several proposals are made, for instance: to use polypropylene (PP) for the regenerators; to substitute the multi-leaf dampers with a rotary slide valve.
Find out more about heat recovery, alternating type units:
- Download the Design Brief for more information on the design principles and product requirements.
- Read the Passive House criteria related to this component here.
- Check the Passive House certified ventilation systems here.
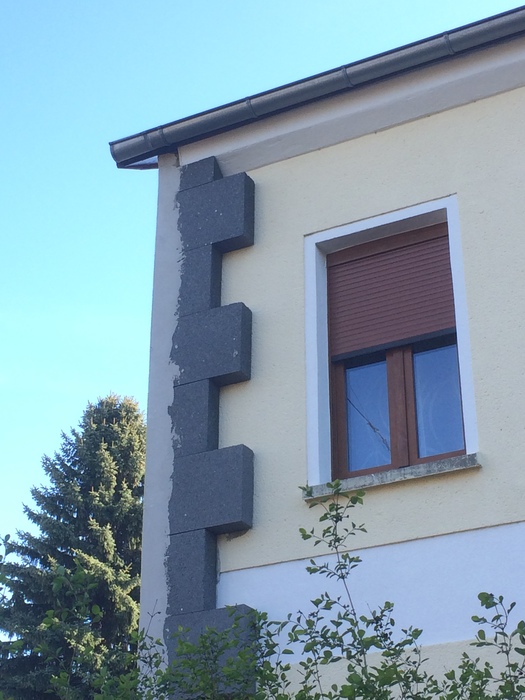
Exterior insulation, corners
In some instances, exterior insulation is added to an old building only in one of the facades. It is comon in such cases that the finishing of the insulation in the corner is not correctly done. The insulation layer is at risk of damage due to weather conditions. The proposed solution is to add a temporary ending to the insulation layer, protecting it completely, but easily removed in the future, when the insulation layer is continued in the other facades. See illustration below.

Find out more about exterior insulation in step-by-step retrofits:
- Download the Design Brief (coming soon).
- Read the Passive House criteria related to this component here.
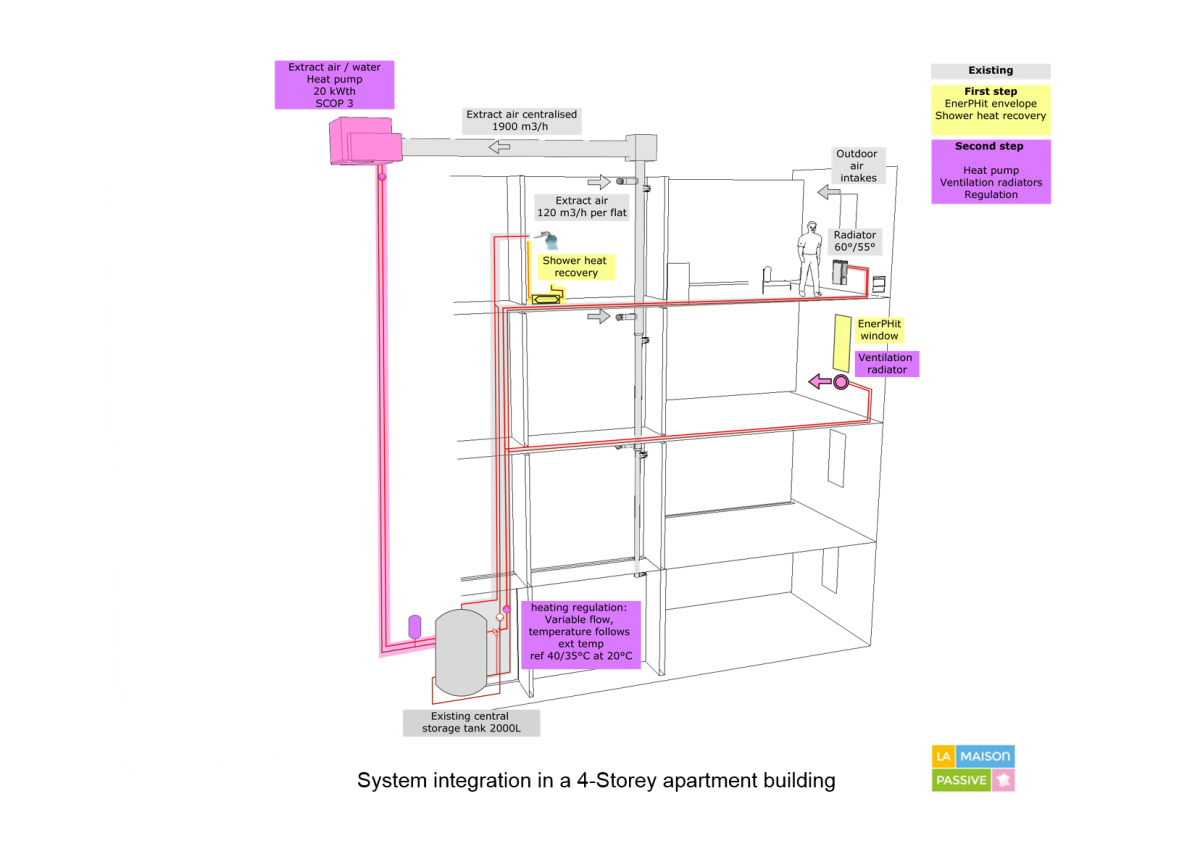
Ventilator/radiator with Heat Pump
This consists of a decentralised ventilation system with local supply air units (ventilator radiators) that would replace radiators located in the exterior wall, heating the incoming air via the existing hydraulic system. The existing ventilation installation from bath and kitchen is used to extract air to the roof where heat is recovered by a heat pump (HP). Air and/or solar panel-based HP solution for hot water should be included in the concept. Renewable energy sources on roof can be used to generate the necessary energy for ventilators and partly for the heat pump. The system should take into account the overall efficiency for heating and hot water for large residential buildings. The efficiency loss for ventilation heat recovery needs to be compensated for by increased hot water efficiency.
Find out more about ventilator/radiators with heat pumps:
- Download the Design Brief.
- Read the Passive House criteria: for ventilation systems (general) and for single-room ventilation systems.
- Check the Passive House certified ventilation systems here.
Decentralized large ventilation units
From the perspective of a step-by-step reconstruction, decentralized large ventilation units are a very interesting alternative which fully complies with gradual reconstruction. Particularly, it is possible to realize only part of larger objects with minimal interference with the building layout and the eventual possibility of only preparation of penetrations at the initial stage of the reconstruction.
Find out more about decentralized ventilation units:
- Download the Design Brief.
- Read the Passive House criteria for ventilation systems.
- Check the Passive House certified ventilation systems here.
Interior Insulation
The energy-relevant refurbishment of existing building stock requires approaches using insulation on the inside, especially in the case of listed historical buildings. The influence of these constructions should be evaluated in terms of building physics. The hygrothermal behaviour of the interior insulation systems cannot be considered in isolation as is done for exterior insulation systems; rather, it is closely related to the material characteristics of the existing wall, the local climatic conditions and utilisation. The increased moisture content of the existing wall due to interior insulation involves the risk of damage, which needs to be assessed. The following criteria are intended to provide valuable tips and guidance for assessment.
The guidelines for internal insulation are focused on two main features of the assessment. First, the planning of the construction solutions to prevent moisture accumulation in or behind the insulation. And, second, the examination of the solutions to evaluate possible damage of the structure, in order to guarantee that the durability of the structure is not decreased, and there are no adverse health effects caused by the addition of the interior insulation.
Find out more about internal insulation:
- Download the Design Brief.
- Read the Passive House criteria for EnerPHit insulation systems here.
- Check the certified wall and construction systems in the database.
See more:
-
PHI's full list of criteria for the different components can be found here.